
I still remember the first time I made elephant ears for a fair-like gathering in my backyard. It was a hot July afternoon, and I had promised a group of twenty neighbors that I’d bring something “fun and different” for dessert. I was aiming for fancy—maybe a fruit tart or some intricate macarons. But then I remembered the state fair, the smell of fried dough wafting through the air, and the sheer joy of eating something messy, sweet, and ridiculously simple. So I ditched the fancy plan and made elephant ears instead.
The result? Pure chaos. Not the bad kind—the good kind. The kind where people are lining up, laughing with powdered sugar on their noses, and asking for the recipe before they’ve even taken a second bite. That’s the power of homemade cinnamon sugar elephant ears. They’re not just a treat; they’re an experience. And the best part? You don’t need a deep fryer or a culinary degree to make them. You just need some dough, a little oil, and a willingness to get a little messy.
I’ve made this recipe for birthday parties, church potlucks, and lazy Sunday afternoons. Every single time, the reaction is the same. People are surprised that it’s homemade. They expect it to be greasy or tough, but these are light, crispy, and perfectly sweet. I’ve tweaked the method over the years to make it as foolproof as possible, and I’m sharing it with you today. If you’ve ever wondered how to make cinnamon sugar elephant ears that actually taste like the fair but with better quality ingredients, you’re in the right place.
This isn’t just about sugar and flour. It’s about bringing people together. It’s about that moment when someone takes a bite, closes their eyes, and says, “Wow, these are amazing.” And honestly? That’s my favorite part of cooking. So, let’s get into it. Grab your apron, and let’s make some magic.
Why You’ll Love This Recipe
There are a hundred reasons I keep coming back to this cinnamon sugar elephant ears recipe, but let’s be real: it’s not just because they taste good (though they do). It’s because they solve a lot of problems for home cooks.
- Stupid Simple — Seriously, if you can roll out dough and sprinkle sugar, you can make these. I’ve walked my teenage nephew through it over the phone while he was at his own apartment. He made a batch that was almost perfect. Almost.
- Lightning Fast — From start to finish, these take about 30 minutes. That’s less time than it takes to wait for a delivery. I make these on weeknights when I want a dessert that feels special but doesn’t require a three-hour bake time.
- Crowd-Pleaser — I’ve served these to picky eaters, health-conscious friends (who still took two), and kids who usually only eat nuggets. Everyone loves them. They’re the universal language of dessert.
- Budget-Smart — Flour, sugar, butter, oil. These ingredients cost pennies compared to store-bought pastries. You can feed a crowd for under $10. That’s less than the cost of a single slice of cake at a bakery.
- Make-Ahead Friendly — You can prep the dough the night before. Just wrap it up and refrigerate. When guests arrive, you just roll, fry, and serve. It makes you look like a hosting genius, even if you did most of the work earlier.
This recipe has completely changed how I approach party desserts. No more stressed-out baking marathons. Just simple, delicious, crispy goodness that makes everyone happy. It’s my go-to when I need dinner—or dessert—to just work.
Ingredients You’ll Need
Here’s the best part: you probably have most of these ingredients already. This isn’t a recipe that requires a special trip to the store. It’s pantry-friendly, which is why I make it on a whim.
For the Dough
Refrigerated biscuit dough (1 can, 16.3 oz / 462g) — I know, I know. Some purists will tell you to make dough from scratch. But for this? Refrigerated biscuits are the secret weapon. They’re already flaky, tender, and perfectly seasoned. I use Pillsbury Grands! for their size and consistency. If you want to make it from scratch, you can, but it takes an hour of resting time. Do you have an hour? Didn’t think so.
Vegetable oil (for frying, about 2 cups / 480ml) — You need enough to fill your skillet about an inch deep. Vegetable or canola oil works best because they have high smoke points. Don’t use olive oil; it’ll taste too strong and burn too easily.
For the Cinnamon Sugar Coating
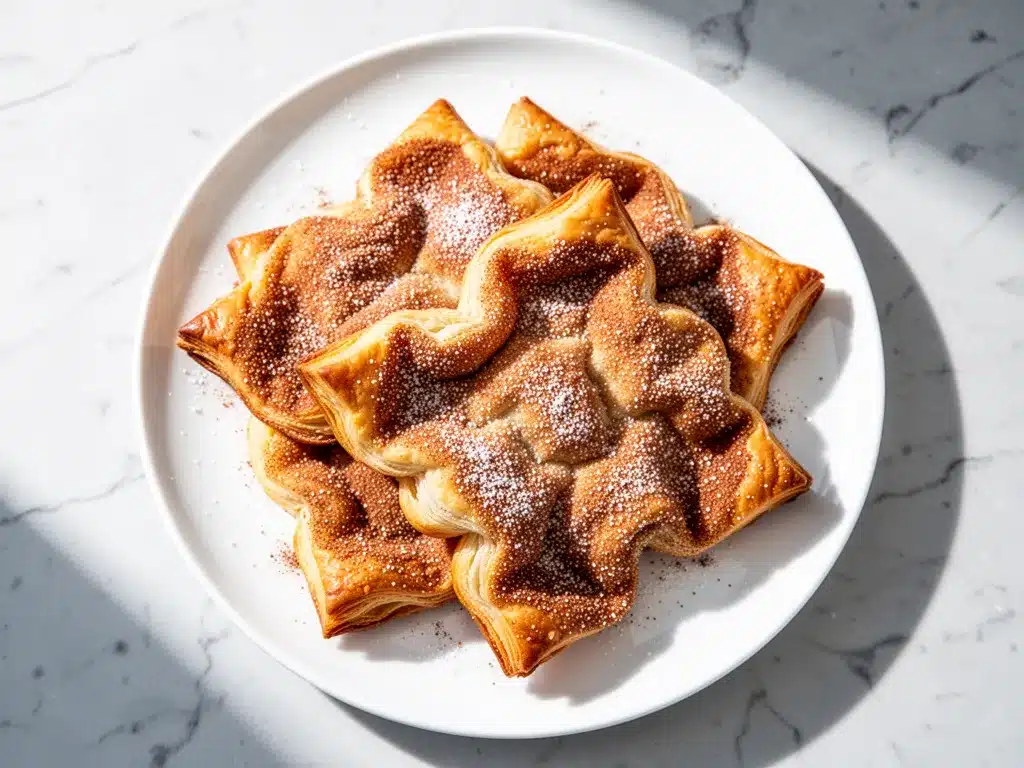
Granulated sugar (1 cup / 200g) — The standard white stuff. Don’t try to substitute with brown sugar for the coating; it’ll make them soggy and chewy instead of crispy. You want that fair-style crunch.
Ground cinnamon (2 teaspoons) — Use a good quality cinnamon. If yours is old and dusty, toss it. Fresh cinnamon makes a huge difference in flavor. I keep a fresh jar on my counter at all times.
Unsalted butter (4 tablespoons / 60g, melted) — This is the glue that holds the sugar to the dough. Melt it in the microwave or a small saucepan. Let it cool slightly so it’s warm, not boiling hot.
Optional: Powdered sugar (for dusting) — I like to do a light dusting of powdered sugar after they’re done frying. It adds a beautiful, snowy finish. It’s not necessary, but it makes them look fancy.
Optional: Vanilla extract (1 teaspoon) — I add this to the melted butter. It enhances the sweetness and gives it that classic pastry smell. It’s a small detail, but it matters.
Equipment Needed
You don’t need fancy equipment for this. Here’s what I actually use.
Large skillet or cast-iron pan — I use a 12-inch cast-iron skillet. It holds heat well and distributes it evenly. If you don’t have cast iron, a heavy-bottomed stainless steel skillet works too. Avoid non-stick if you can; you want that nice browning.
Slotted spoon or spider strainer — Essential for lifting the fried dough out of the oil without draining it too much. A regular slotted spoon works if you’re careful.
Paper towels — Line a baking sheet or plate with paper towels to drain the excess oil. This keeps them from getting greasy.
Rolling pin — To flatten the biscuits. A standard wooden one works fine.
Small bowl — For mixing the cinnamon and sugar.
Pastry brush — Optional, but helpful for brushing the melted butter onto the dough evenly.
How to Make It: Step-by-Step
Alright, let’s make these! I’m walking you through exactly how I do it, including the little tricks I’ve picked up. This process is faster than you think, but attention to detail is key.
Step 1: Prep Your Station (5 minutes)
Before you start cooking, get everything ready. Mix the granulated sugar and cinnamon in a small bowl. Set it aside. Melt the butter and keep it warm. Line a baking sheet with paper towels. This is crucial because once you start frying, things move fast. You don’t want to be hunting for sugar while your dough is bubbling in oil.
Step 2: Separate and Flatten the Dough (5 minutes)
Open your can of biscuit dough. Separate the biscuits. You’ll get about 8-10 biscuits from a standard can. On a lightly floured surface, roll each biscuit out until it’s very thin—about 1/8 inch thick. You want them large and irregularly shaped, like an elephant’s ear. Don’t make them perfect circles. The irregular edges are what give them their name and their texture. If they’re too thick, they’ll be doughy in the middle. Thin is the goal here.
Step 3: Heat the Oil (5 minutes)
Pour about an inch of vegetable oil into your skillet. Heat it over medium-high heat. You want the oil to reach 350°F (175°C). If you don’t have a thermometer, drop a small piece of dough into the oil. If it sizzles and rises to the top immediately, it’s ready. If it sinks, it’s too cold. If it burns instantly, it’s too hot. This takes about 5 minutes.
Step 4: Fry the Dough (2-3 minutes per batch)
Carefully place one flattened biscuit into the hot oil. Don’t overcrowd the pan; fry one or two at a time depending on your pan size. Fry for about 1-2 minutes on each side, until they are golden brown and puffed up. They should look like little balloons. Flip them once. Use your slotted spoon to gently press down on the puffed areas to help them cook evenly. Remove when golden and drain on the paper towels.
Step 5: Coat with Cinnamon Sugar (2 minutes)
While the first batch is frying, brush the warm fried elephant ears with melted butter. Do this while they’re still hot so the butter sticks. Then, immediately sprinkle them generously with the cinnamon sugar mixture. Flip them and do the other side. You want them fully coated. If they’re cooling down, you can reheat the butter slightly.
Step 6: Serve Immediately
These are best served warm, right off the paper towels. They’ll stay crispy for about 10-15 minutes. If you’re making a big batch, keep the finished ones warm in a low oven (200°F) while you fry the rest. Dust with powdered sugar if you’re feeling fancy. Serve with a side of caramel sauce or ice cream if you want to go all out.
Total Time: About 30 minutes (10 minutes prep, 20 minutes frying).
Expert Tips & Tricks
Here’s everything I’ve learned from making these dozens of times. These tips will save you from my mistakes.
Don’t Skip the Flattening — This is the most important step. If you fry the biscuits whole, they’ll be puffy donuts. You want the flat, crispy texture. Roll them out thin. Really thin. You’ll be surprised how much they expand when fried.
Control the Heat — Medium-high is the sweet spot. If the oil is too hot, the outside will burn before the inside cooks. If it’s too cool, the dough will absorb too much oil and become greasy. Test the oil before dropping the dough in.
Use a Spider Strainer — A slotted spoon is okay, but a spider strainer is better. It lets you lift the dough out quickly without shaking off the sugar or butter. It’s a small investment that makes a big difference.
Keep Them Warm — If you’re serving a crowd, keep the finished elephant ears warm in a 200°F oven on a wire rack. This prevents them from getting soggy from steam. Don’t stack them on top of each other; let them breathe.
Double the Cinnamon — If you love cinnamon like I do, double the amount. It’s hard to have too much cinnamon sugar with these. Just make sure you have enough sugar to balance it out.
Variations & Substitutions
Once you’ve nailed the basic version, here’s how you can mix it up. I’ve tried all of these.
Chocolate Drizzle — After coating with cinnamon sugar, drizzle with melted chocolate. It’s decadent and looks beautiful. Great for birthdays.
Apple Cinnamon — Sauté chopped apples in the butter before brushing it on the dough. Add a pinch of nutmeg to the sugar mix. It tastes like an apple pie in dough form.
Maple Glaze — Instead of cinnamon sugar, brush with maple syrup and a little butter. Sprinkle with crushed pecans. This is a fall favorite.
Gluten-Free — Use gluten-free biscuit dough. Most brands work well. Just follow the same steps. The texture might be slightly different, but they’re still delicious.
Baked Version — If you want to avoid frying, bake the flattened dough at 375°F for 10-12 minutes until golden. Brush with butter and sugar after baking. It’s lighter but not as crispy.
Serving & Storage
How to Serve: I usually serve these straight from the paper towels at the dinner table. They’re messy, and that’s part of the fun. But here are other ways I’ve enjoyed them:
- With Ice Cream: A scoop of vanilla bean ice cream on top is classic. The hot dough and cold ice cream is a texture dream.
- With Caramel Sauce: Drizzle warm caramel over the top. It’s rich and indulgent.
- With Fruit: Fresh strawberries or blueberries cut through the sweetness. It’s a nice balance.
Storage Instructions: These are best eaten fresh. They don’t store well because they lose their crispiness. If you must store them, keep them in an airtight container at room temperature for up to 2 days. Reheat in the oven at 350°F for 5 minutes to restore crispiness. They won’t be exactly the same, but they’ll be okay. Don’t freeze them; the texture will be terrible.
Pro Tip: If you have leftovers, crumble them up and use them as a topping for ice cream or yogurt. It’s like a cinnamon sugar crumble. Don’t waste them!
Nutrition Information
I’m not a nutritionist, but here’s the breakdown if you’re tracking. These are indulgent treats, so enjoy them in moderation.
Per Serving (based on 8 servings):
| Nutrient | Amount |
|---|---|
| Calories | 280 |
| Protein | 3g |
| Carbs | 42g |
| Fiber | 1g |
| Sugar | 22g |
| Fat | 12g |
| Sodium | 350mg |
What’s Good: They’re a fun treat for special occasions. Not something I make every day, but perfect for parties.
What to Know: Higher in calories and sugar due to the frying and coating. Use less oil if you’re concerned, but it’ll affect the texture. They contain gluten and dairy.
My Take: Look, this is a dessert. It’s meant to be enjoyed. It’s not a health food. But it’s way better than store-bought, costs less, and you know exactly what’s in it. When I make these, I make a big batch and share them with friends. The joy they bring is worth every calorie.
Final Thoughts
So that’s my homemade cinnamon sugar elephant ears recipe! I’ve probably talked your ear off at this point, but when you make a recipe this often, you have a lot to say about it.
This has saved party desserts more times than I can count. It’s my answer to “what’s for dessert?” when I want something fun and festive without the stress. My kids are happy, my friends are happy, and I’m happy because I’m not stressed about cooking.
Make it yours! Try different toppings, swap in your favorite spices, or serve it with different dips. The best recipes are the ones you adapt to your family’s tastes.
If you make this, drop a comment and let me know what you think! I love hearing how recipes turn out in your kitchen. And if something doesn’t work, tell me that too—I’m here to help troubleshoot.
Happy cooking! And I hope your kitchen smells half as good as mine does right now.
Frequently Asked Questions
Q: Can I make these ahead of time?
A: You can prep the dough ahead, but it’s best to fry them just before serving. The fried dough loses its crispiness quickly. If you must make ahead, fry them, let them cool completely, and store in an airtight container. Reheat in the oven to restore crispiness.
Q: Why did my elephant ears get soggy?
A: This usually happens if the oil wasn’t hot enough, causing the dough to absorb too much oil. Or, if you stacked them while they were still hot, trapping steam. Always drain on paper towels and keep them separate.
Q: Can I use homemade dough instead of biscuits?
A: Yes, but it’s more work. You’ll need a simple yeast dough or puff pastry. Roll it out thin and cut into irregular shapes. Follow the same frying steps. It takes longer, but the flavor might be richer.
Q: How do I know when the oil is ready?
A: Use a thermometer (350°F/175°C). If you don’t have one, drop a small piece of dough in. If it sizzles and rises immediately, it’s ready. If it sinks, wait longer. If it burns instantly, let it cool.
Q: Can I bake these instead of frying?
A: Yes, bake at 375°F for 10-12 minutes until golden. Brush with butter and sugar after baking. They’ll be lighter but not as crispy. It’s a good option if you’re avoiding fried foods.
Q: What’s the best way to store leftovers?
A: Store in an airtight container at room temperature for up to 2 days. Reheat in the oven at 350°F for 5 minutes. Don’t refrigerate; they’ll get stale faster.
Q: Can I double this recipe?
A: Absolutely! Double the dough and fry in batches. Just make sure your skillet is big enough to fry 1-2 pieces at a time without overcrowding. Keep finished pieces warm in a low oven.
Pin This Recipe!


Homemade Cinnamon Sugar Elephant Ears: 5-Step Easy Party Treat
- Total Time: 30 minutes
- Yield: 8 servings 1x
Description
Light, crispy, and perfectly sweet homemade cinnamon sugar elephant ears made with refrigerated biscuit dough. These fair-style treats are easy to make, budget-friendly, and perfect for parties.
Ingredients
- 1 can (16.3 oz / 462g) refrigerated biscuit dough (e.g., Pillsbury Grands!)
- 2 cups (480ml) vegetable or canola oil (for frying)
- 1 cup (200g) granulated sugar
- 2 teaspoons ground cinnamon
- 4 tablespoons (60g) unsalted butter, melted
- 1 teaspoon vanilla extract (optional)
- Powdered sugar for dusting (optional)
Instructions
- Mix granulated sugar and cinnamon in a small bowl. Melt butter and keep warm. Line a baking sheet with paper towels.
- Separate the biscuits from the can. On a lightly floured surface, roll each biscuit out until very thin (about 1/8 inch thick) into irregular shapes.
- Pour about an inch of vegetable oil into a large skillet or cast-iron pan. Heat over medium-high heat until it reaches 350°F (175°C).
- Carefully place one flattened biscuit into the hot oil. Fry for 1-2 minutes on each side until golden brown and puffed up. Do not overcrowd the pan.
- Remove fried dough with a slotted spoon or spider strainer and drain on paper towels.
- While still hot, brush the fried dough with melted butter (mixed with vanilla if using).
- Immediately sprinkle generously with the cinnamon sugar mixture on both sides.
- Serve immediately while warm. Keep finished pieces warm in a 200°F oven if making a large batch.
Notes
Ensure the oil is at 350°F to prevent greasy results. Roll the dough thin for crispiness. Do not stack hot elephant ears as steam will make them soggy. Best served fresh; leftovers can be reheated in the oven at 350°F for 5 minutes.
- Prep Time: 10 minutes
- Cook Time: 20 minutes
- Category: Dessert
- Cuisine: American
Nutrition
- Serving Size: 1 elephant ear
- Calories: 280
- Sugar: 22
- Sodium: 350
- Fat: 12
- Saturated Fat: 3
- Carbohydrates: 42
- Fiber: 1
- Protein: 3
Keywords: elephant ears, cinnamon sugar, fried dough, party dessert, fair food, easy dessert, homemade treats



