
Last August, I was standing in my kitchen at 6:45 AM, staring at a colander of cold pasta like it held the secrets to the universe. My kids had just eaten breakfast, I hadn’t had my coffee, and the lunchbox situation for the next ten months loomed over me like a dark cloud. I didn’t want sandwiches. I definitely didn’t want leftovers from last night’s dinner (which, let’s be honest, usually ends up in the trash by Tuesday). I wanted something that felt special, something they’d actually open, but I didn’t want to spend my morning playing lunchbox chef.
That’s when I made these Chicken Caesar Wrap Lunchbox Rolls. They’re not just wraps. They’re rolled tight, sliced into bite-sized pinwheels, and packed in a little container so they don’t get soggy or messy. It’s the kind of lunch that makes your kid feel like they’re getting a treat at school, while you’re actually getting five extra minutes of sleep because you prepped it the night before.
I’ve been making these since that chaotic Tuesday morning. They’ve survived field trips, soccer practice, and my daughter’s “I don’t like cold food” phase (which, surprise, they actually eat these because the chicken is room temp and the wrap is soft). If you’re looking for a lunchbox solution that is simple, forgiving, and actually delicious, stop scrolling. This is the one.
Why You’ll Love This Recipe
I know what you’re thinking. “More wraps? Really?” Hear me out. There’s a reason these have become my absolute go-to for the school year. They solve the three biggest problems of lunch packing: mess, boredom, and ingredient mismatch.
Zero Mess Factor
Regular wraps get floppy. The fillings slide out. Your kid opens the bag, and suddenly they have chicken and lettuce on their desk. These rolls are wrapped tight in plastic or foil, chilled until firm, and then sliced. They hold their shape. They’re contained. My kids can shove them in their mouths without making a scene.
The Caesar Flavor is Non-Negotiable
Caesar salad is basically everyone’s favorite salad, but nobody wants to carry a bowl of leaves in a lunchbox. This recipe captures that creamy, garlicky, cheesy flavor profile in a format that works. The dressing clings to the chicken and the wrap, so every bite is flavorful. No dry chicken. No bland tortillas.
Beginner-Proof

You don’t need to roast a chicken from scratch. You don’t need to make Caesar dressing from zero (though you can). This recipe relies on shortcuts that taste just as good. If you can spread mayo and roll a towel, you can make this. I’ve made this while my toddler was climbing on my back. It’s that easy.
Pantry and Fridge Friendly
You probably have most of this already. Tortillas, rotisserie chicken, parmesan, mayo, mustard, garlic. That’s it. It’s cheap, it’s fast, and it tastes like you spent twenty minutes on it when you really spent five.
Ingredients You’ll Need
Here’s the thing about this recipe: it’s minimalist. We aren’t doing a fifteen-ingredient grocery run. We’re doing a “grab what you have” lunchbox win. I’m particular about three things here, but mostly, it’s about keeping it simple.
For the Filling
Flour tortillas (6-inch or 8-inch) — I prefer 6-inch for smaller rolls, but 8-inch works if you want bigger bites. The key is they need to be soft and pliable. If they’re old and cracking, toss them. You need them to roll without breaking.
Rotisserie chicken (2 cups, shredded) — This is your secret weapon. Don’t boil chicken breasts for this. Use the store-bought rotisserie chicken or leftover roasted chicken. Shred it by hand or with two forks. It’s tender and flavorful. If you’re using canned chicken, drain it *really* well, or your rolls will be soggy.
Caesar dressing (½ cup) — I use a good quality bottled Caesar dressing. Ranch doesn’t work here. Italian doesn’t work. It has to be Caesar. I like the creamy kind, not the vinaigrette kind. If you want to get fancy, you can make your own, but for a weeknight lunch? Store-bought is fine. It’s consistent and reliable.
Parmesan cheese (½ cup, freshly grated) — Buy the block. Grate it yourself. Pre-grated parmesan has that waxy coating that doesn’t melt or blend well into the dressing. Freshly grated parmesan adds that salty, umami punch that makes Caesar what it is. Don’t skip this.
Romaine lettuce (1 cup, chopped finely) — This is the only fresh veggie you need. Chop it small. I don’t want big chunks of lettuce in my roll. I want it to distribute evenly so every bite has a crunch. If your kids hate lettuce, you can skip it, but it adds that necessary texture contrast.
Garlic powder (½ teaspoon) — Just a little boost. If your Caesar dressing is already garlic-heavy, you can skip this. But I like that extra savory note.
Salt and black pepper — To taste. The parmesan and dressing are salty, so taste before adding more.
For the Wrap
Plastic wrap or aluminum foil — You need this to roll them tight. Plastic wrap is easier for slicing later. Foil is better if you’re packing them immediately in the lunchbox.
Equipment Needed
You don’t need anything fancy. Here’s what I actually use:
Large mixing bowl — For tossing the chicken, dressing, and cheese together. Any bowl works.
Sharp knife — For slicing the rolls. A serrated bread knife works too, but a sharp chef’s knife is cleanest.
Rolling pin (optional) — I don’t always use one, but if your tortillas are thick, rolling them slightly flat helps them roll tighter.
Plastic wrap — Lots of it. Cut into 12-inch squares.
Cutting board — For prepping the chicken and lettuce.
How to Make It: Step-by-Step
Alright, let’s make this! I’m walking you through exactly how I do it. It’s foolproof. You really can’t mess this up.
Step 1: Prep the Chicken Mixture (5 minutes)
In your large bowl, combine the shredded chicken, chopped romaine, grated parmesan, Caesar dressing, garlic powder, salt, and pepper. Toss it all together until the chicken is thoroughly coated. The mixture should look moist and creamy. If it looks dry, add a little more dressing. If it looks soupy, add a little more parmesan or chicken. Aim for a spreadable consistency, like a thick dip.
Step 2: Lay Out the Tortillas
Take your tortillas and lay them out on a clean surface. If you’re using 8-inch tortillas, you can cut them in half to make smaller rolls, or leave them whole for bigger ones. I like 6-inch tortillas because they’re the perfect size for a lunchbox container. If your tortillas are stiff, microwave them for 10 seconds to soften them up. This makes rolling way easier.
Step 3: Spread the Filling
Take a generous scoop of the chicken mixture (about ¼ to ⅓ cup) and spread it over the tortilla, leaving a 1-inch border at the edges. Spread it evenly. Don’t pile it in the middle; you want it distributed from edge to edge so the roll doesn’t burst open. Be gentle—you don’t need to mash the lettuce.
Step 4: Roll It Up Tight
This is the most important step. Place a sheet of plastic wrap under the tortilla. Roll the tortilla up tightly from the bottom edge, using the plastic wrap to help you tighten it. Roll it like a sleeping bag. Make sure there are no air pockets. Once it’s rolled, use the plastic wrap to twist the ends like a candy wrapper. This locks the shape. Put it in the fridge for at least 30 minutes. This chills the filling and firms up the wrap, making it sliceable.
Step 5: Slice and Serve
After chilling, take the roll out of the fridge. Remove the plastic wrap. Use a sharp knife to slice the roll into 1-inch pinwheels. You’ll get about 4-6 pieces per roll. Pack them in a container with a lid. They’re ready to go!
Expert Tips & Tricks
Here’s everything I’ve learned from making these dozens of times. These tips will save you from my mistakes.
Chill Before Slicing
I cannot stress this enough. If you try to slice these warm or at room temperature, they will be a mess. The fats in the cheese and dressing need to firm up. Chill them for at least 30 minutes, but overnight is best. This is the difference between a pretty pinwheel and a chicken salad blob.
Don’t Overfill
It’s tempting to pile on the chicken, but if the layer is too thick, the roll will burst. Keep it thin and even. Better to make more rolls than have them explode in the lunchbox.
The Lettuce Crunch
Some people skip lettuce in wraps because it gets soggy. But in these rolls, because they’re chilled and sliced, the lettuce stays crisp. Just make sure you chop it small. Big leaves will create air pockets and weaken the structure.
Make Ahead Strategy
You can make these up to 2 days in advance. Store them in an airtight container in the fridge. They actually taste better after a day because the flavors meld together. This is perfect for Sunday meal prep.
Variations & Substitutions
Once you’ve nailed the basic version, here’s how you can mix it up. I’ve tried all of these.
Bacon Caesar
Add crispy crumbled bacon to the chicken mixture. This is a game-changer. The smoky saltiness pairs perfectly with the creamy dressing. It’s like a BLT meets Caesar.
Avocado Caesar
Add ½ cup of diced avocado. This makes it extra creamy and adds healthy fats. Note: Avocado can brown slightly, so pack these on the day you make them.
Spicy Caesar
Add a teaspoon of sriracha or jalapeño to the dressing. Or use a spicy Caesar dressing if you can find it. Good for kids who like a kick.
Turkey Caesar
Use shredded rotisserie turkey instead of chicken. Same great flavor, slightly different texture. Great for variety.
Gluten-Free
Use gluten-free tortillas. Most brands work well for this, but check the flexibility. Some GF tortillas are brittle and crack when rolled. Look for ones labeled “pliable” or “wrap-style.”
Vegan Option
Use vegan chicken substitute (like soy curls or chickpea shreds), vegan Caesar dressing, and nutritional yeast instead of parmesan. It’s not quite the same, but it’s still delicious.
Serving & Storage
How to Serve:
I usually pack these in a small bento-style box. They look beautiful and feel like a treat. Add a side of fruit or veggies if you want a complete lunch.
Side Dishes:
Apple slices, carrot sticks, or a small bag of chips. Keep it simple. The wrap is the star.
Storage Instructions:
Refrigerator:
Store in an airtight container for up to 3 days. They will stay firm and tasty. If they start to get soft, that’s normal—just eat them sooner.
Freezing:
I don’t recommend freezing these. The lettuce and tortillas don’t thaw well. They’ll get mushy. Make them fresh or store in the fridge.
Lunchbox Packing:
If you’re packing them for school, put them in the container cold. No need for an ice pack if they’ve been chilled, but if it’s a hot day, throw an ice pack in the bag. The plastic wrap helps keep them from sticking to each other.
Nutrition Information
I’m not a nutritionist, but here’s the breakdown if you’re tracking.
Per Serving (based on 1 pinwheel, yields about 20-24 total):
Calories: 120
Protein: 8g
Carbs: 10g
Fat: 6g
Sodium: 250mg
What’s Good:
High protein from the chicken. Good balance of carbs from the tortilla. Calcium from the parmesan.
What to Know:
Moderate sodium due to the dressing and cheese. You can reduce sodium by using low-sodium chicken broth if you’re shredding your own chicken, or by using less dressing.
My Take:
Look, this is a lunchbox wrap with cheese and dressing. It’s not a diet food. But it’s way better than a plain turkey sandwich, and it’s homemade. When I want to make it lighter, I use less dressing and more lettuce. But usually? I just pack a few and enjoy them.
Final Thoughts
So that’s my go-to Chicken Caesar Wrap Lunchbox Rolls! I know I’ve talked a lot about how simple this is, but when you’re in the thick of the school year, simple is everything. This has saved me from the lunchbox boredom trap more times than I can count. It’s my answer to “what’s for lunch?” when I’m tired, don’t want to cook, and still want something that tastes really good.
Make it yours! Try different add-ins, swap in your favorite chicken, adjust the garlic. The best recipes are the ones you adapt to your family’s tastes. If you make this, drop a comment and let me know what you think! I love hearing how recipes turn out in your kitchen.
Happy packing! And I hope your kitchen smells half as good as mine does right now.
Frequently Asked Questions
Can I use whole wheat tortillas?
Yes! Whole wheat tortillas work great and add a nutty flavor. They might be slightly thicker, so roll them a bit more carefully. My kids actually prefer them because they’re heartier.
Why did my rolls fall apart when I sliced them?
Most likely, they didn’t chill long enough. The filling needs to be firm so the knife can cut through cleanly. Chill them for at least 30 minutes, preferably overnight. Also, make sure you’re rolling them tight. Loose rolls will unravel.
Can I make these the night before?
Absolutely. This is actually the best way to do it. Make them, chill them overnight, and slice them in the morning. They’ll be perfect. Just pack them in the container in the morning so they don’t get squished.
What if my kids don’t like Caesar dressing?
Then this might not be for them! But if they like ranch or Italian dressing, you can try those. However, Caesar is the classic for a reason. If they hate creamy dressings, try mixing the Caesar with a little mayo to lighten it up, or use a vinaigrette Caesar.
Can I use canned chicken?
You can, but drain it *really* well. Canned chicken is wet, and wet chicken makes soggy wraps. Press it with paper towels to remove as much moisture as possible before mixing it with the dressing.
How many pinwheels should I pack per lunch?
It depends on the size of the pinwheels and the appetite of the kid. For 6-inch tortillas, you’ll get about 4-6 pinwheels per roll. I usually pack 2-3 rolls per lunchbox, so 8-12 pinwheels total. That’s a good amount for a growing kid.
Can I add croutons?
Yes, but add them right before packing. If you add them to the filling and store them, they’ll get soft and soggy. Pack them in a separate little container if you want them crunchy.
Pin This Recipe!
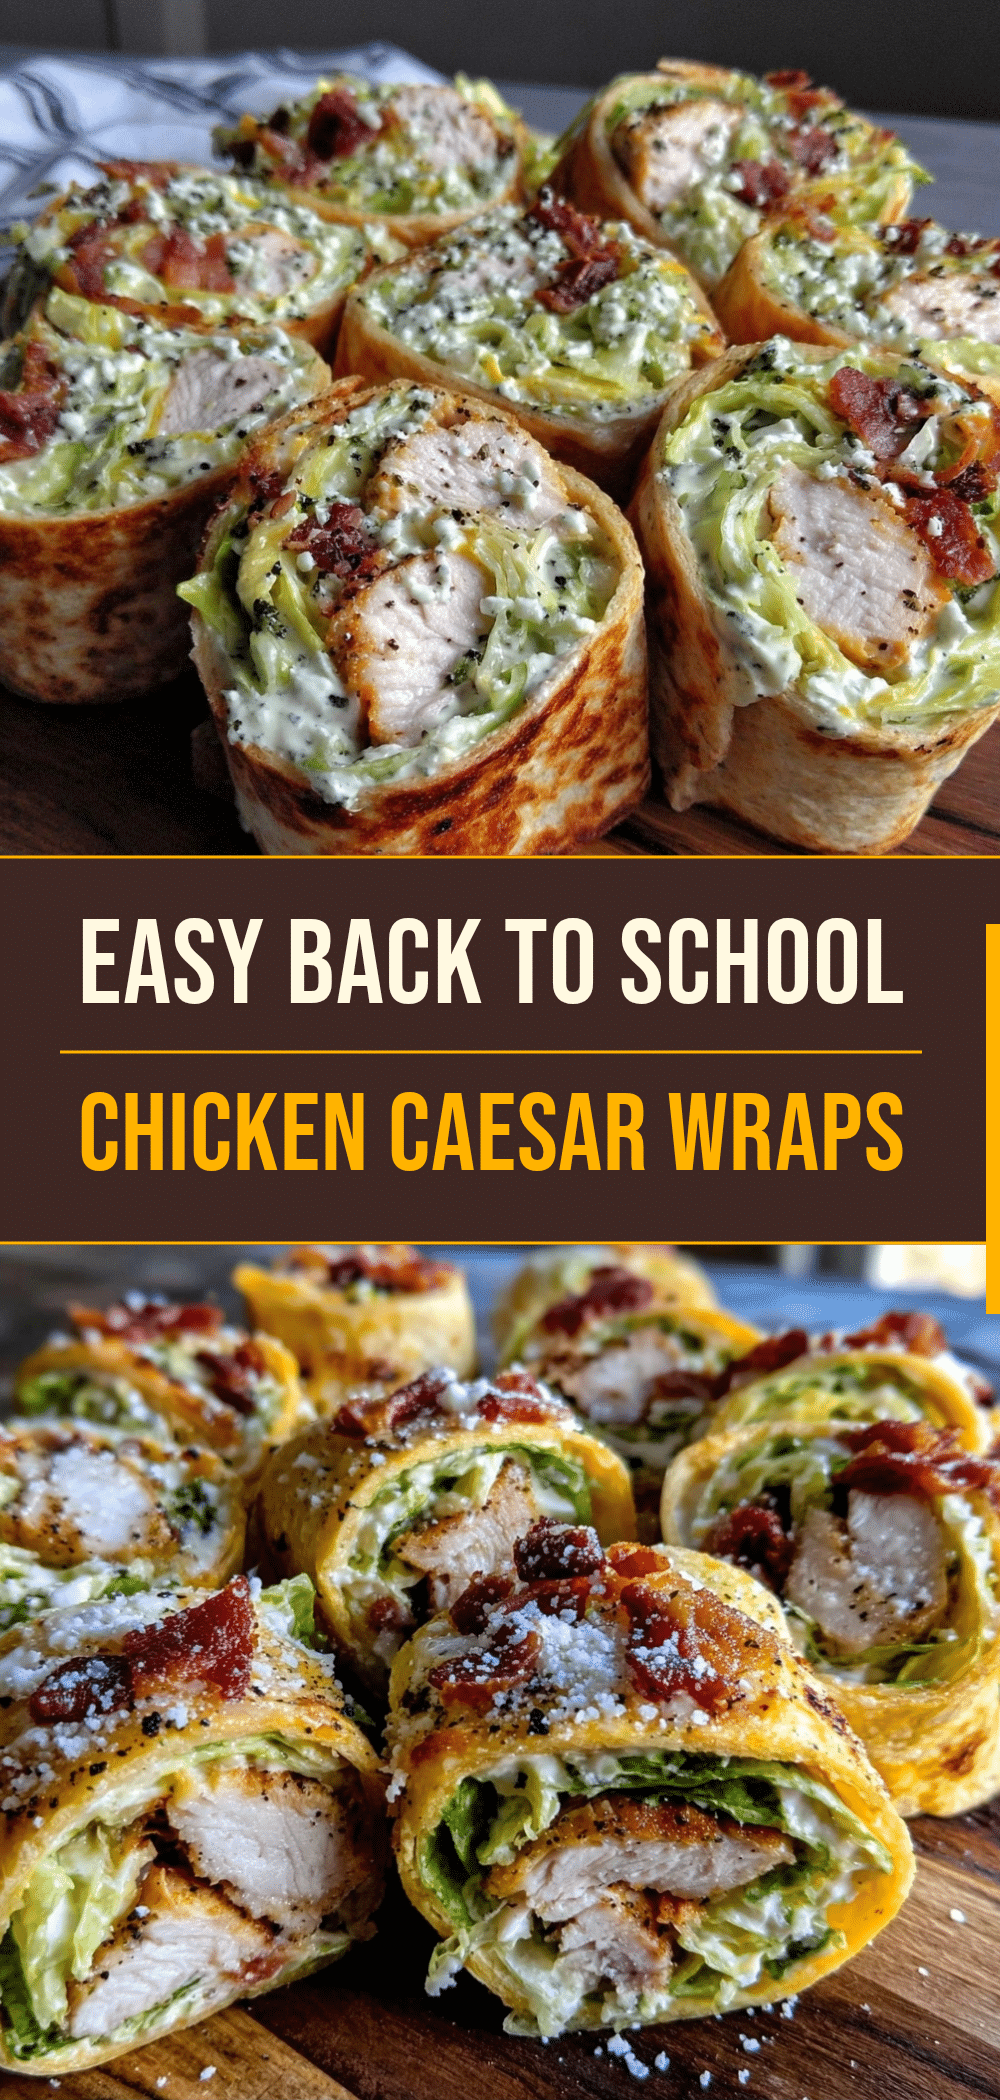

Chicken Caesar Wrap Lunchbox Rolls: The Foolproof Back-to-School Lunch
- Total Time: 45 minutes
- Yield: 20-24 pinwheels 1x
Description
These Chicken Caesar Wrap Lunchbox Rolls are rolled tight, sliced into bite-sized pinwheels, and packed in a container to prevent mess. They are a simple, make-ahead lunch solution that captures the creamy, garlicky flavor of Caesar salad in a portable format.
Ingredients
- 6-inch or 8-inch flour tortillas (soft and pliable)
- 2 cups shredded rotisserie chicken
- 1/2 cup creamy Caesar dressing
- 1/2 cup freshly grated Parmesan cheese
- 1 cup finely chopped romaine lettuce
- 1/2 teaspoon garlic powder
- Salt and black pepper to taste
- Plastic wrap or aluminum foil for rolling
Instructions
- In a large mixing bowl, combine the shredded chicken, chopped romaine, grated Parmesan, Caesar dressing, garlic powder, salt, and pepper. Toss until the chicken is thoroughly coated and the mixture has a spreadable, moist consistency.
- Lay out the tortillas on a clean surface. If using 8-inch tortillas, you can cut them in half. If tortillas are stiff, microwave them for 10 seconds to soften.
- Spread a generous scoop of the chicken mixture (about 1/4 to 1/3 cup) over each tortilla, leaving a 1-inch border at the edges. Distribute the filling evenly from edge to edge.
- Place a sheet of plastic wrap under the tortilla. Roll the tortilla up tightly from the bottom edge, using the plastic wrap to help tighten it and remove air pockets. Twist the ends of the plastic wrap like a candy wrapper to lock the shape.
- Refrigerate the rolled tortillas for at least 30 minutes (or overnight) to chill and firm up the filling.
- Remove the rolls from the fridge and unwrap them. Use a sharp knife to slice each roll into 1-inch pinwheels.
- Pack the pinwheels in a lunchbox container. They can be stored in an airtight container in the refrigerator for up to 3 days.
Notes
Chill the rolls for at least 30 minutes before slicing to ensure they hold their shape. Do not freeze these as the lettuce and tortillas will become mushy upon thawing. For a gluten-free option, use pliable gluten-free tortillas. For a vegan option, use vegan chicken substitute, vegan Caesar dressing, and nutritional yeast.
- Prep Time: 15 minutes
- Cook Time: 0 minutes
- Category: Lunch
- Cuisine: American
Nutrition
- Serving Size: 1 pinwheel
- Calories: 120
- Sugar: 1
- Sodium: 250
- Fat: 6
- Saturated Fat: 2
- Carbohydrates: 10
- Fiber: 1
- Protein: 8
Keywords: chicken caesar wrap, lunchbox rolls, school lunch, pinwheels, meal prep, rotisserie chicken, easy lunch, kid-friendly lunch



